Vue基础入门到实战3(生命周期+工程化开发+组件化开发)
1 Vue生命周期
1.1 简介
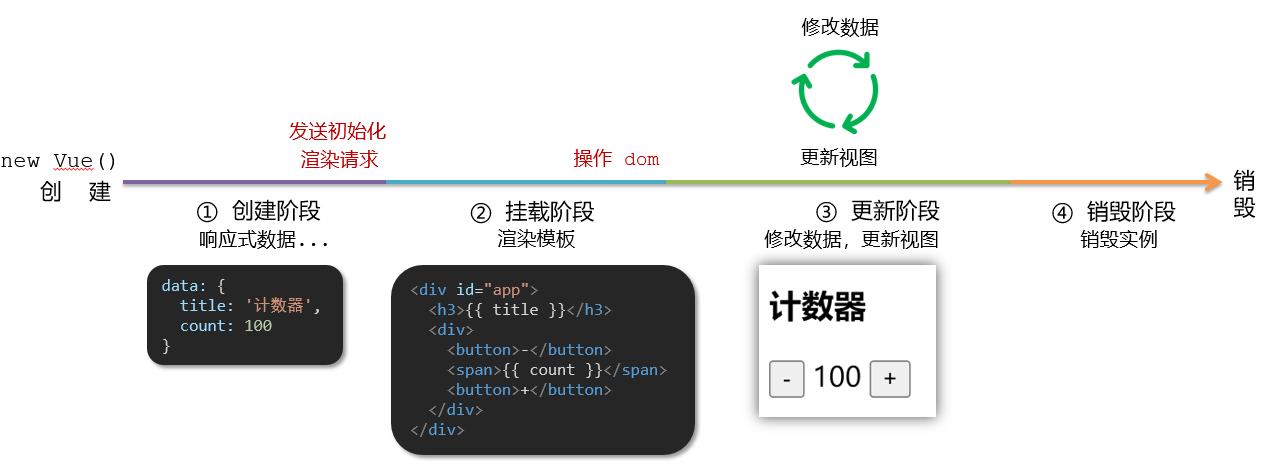
思考:什么时候可以发送初始化渲染请求?(越早越好)什么时候可以开始操作dom?(至少dom得渲染出来)
Vue生命周期:就是一个Vue实例从创建 到 销毁 的整个过程。
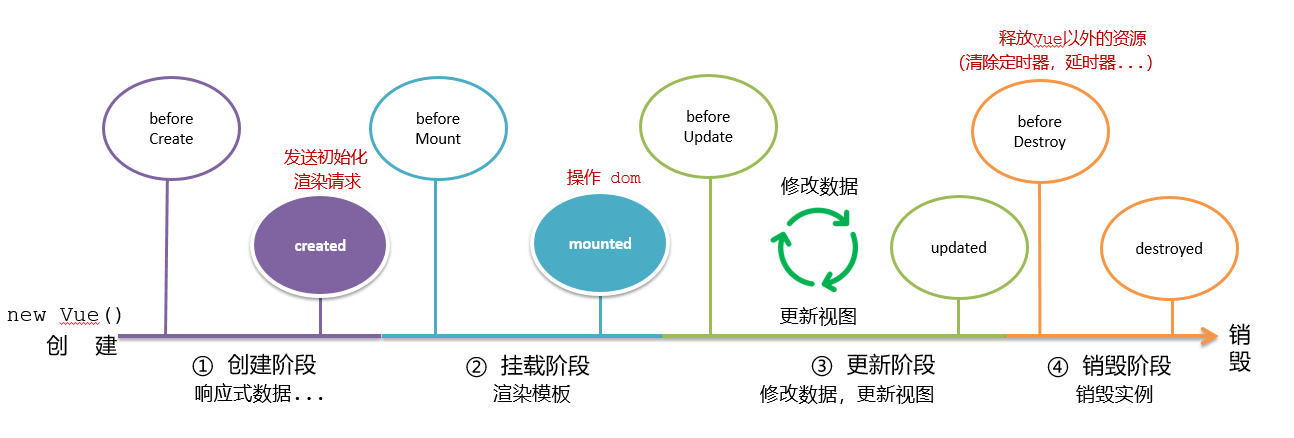
生命周期四个阶段:① 创建 ② 挂载 ③ 更新 ④ 销毁
1.创建阶段:创建响应式数据;
2.挂载阶段:渲染模板;
3.更新阶段:修改数据,更新视图;
4.销毁阶段:销毁Vue实例。
1.2 Vue生命周期钩子
Vue生命周期过程中,会 自动运行一些函数,被称为【生命周期钩子】→ 让开发者可以在【特定阶段】运行 自己的代码
1 | |
1.3 生命周期钩子小案例
在created中发送数据
1 | |
1.4 案例-小黑记账清单
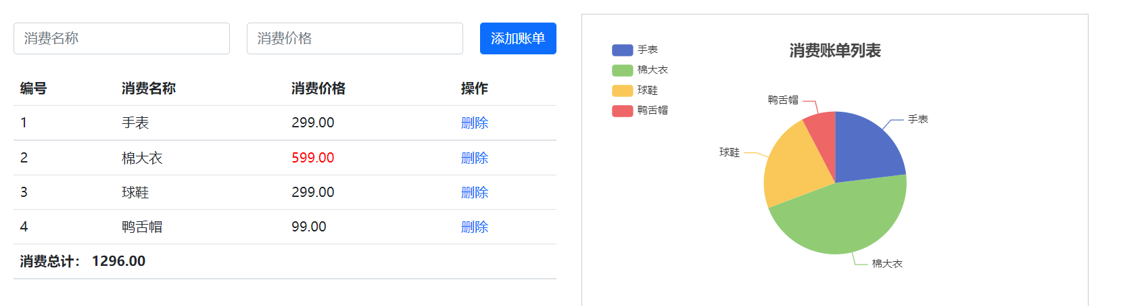
1.4.1 需求图示
1.4.2 需求分析
1.基本渲染
2.添加功能
3.删除功能
4.饼图渲染
1.4.3 思路分析
1.基本渲染
- 立刻发送请求获取数据 created
- 拿到数据,存到data的响应式数据中
- 结合数据,进行渲染 v-for
- 消费统计 —> 计算属性
2.添加功能
- 收集表单数据 v-model,使用指令修饰符处理数据
- 给添加按钮注册点击事件,对输入的内容做非空判断,发送请求
- 请求成功后,对文本框内容进行清空
- 重新渲染列表
3.删除功能
- 注册点击事件,获取当前行的id
- 根据id发送删除请求
- 需要重新渲染
4.饼图渲染
- 初始化一个饼图 echarts.init(dom) mounted钩子中渲染
- 根据数据试试更新饼图 echarts.setOptions({…})
1.4.4 代码准备
1 | |
2 工程化开发和脚手架
2.1 开发Vue的两种方式
- 核心包传统开发模式:基于html / css / js 文件,直接引入核心包,开发 Vue。
- 工程化开发模式:基于构建工具(例如:webpack)的环境中开发Vue。
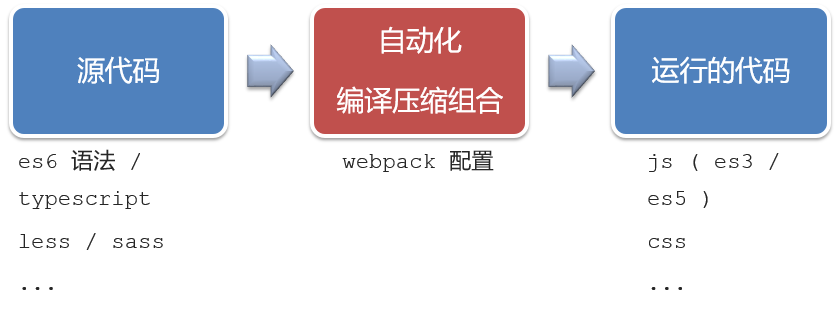
工程化开发模式优点:
提高编码效率,比如使用 JS 新语法、Less/Sass、Typescript 等通过 webpack 都可以编译成浏览器识别的 ES3/ES5/CSS 等
工程化开发模式问题:
- webpack 配置 不简单
- 雷同 的基础配置
- 缺乏 统一的标准
为了解决以上问题,所以我们需要一个工具,生成标准化的配置
2.2 脚手架Vue CLI
Vue CLI 是Vue官方提供的一个 全局命令工具。可以帮助我们 快速创建 一个开发Vue项目的 标准化基础架子。【集成了webpack配置】
好处
- 开箱即用,零配置
- 内置babel等工具
- 标准化的webpack配置
使用步骤
- 全局安装(只需安装一次即可)
yarn global add @vue/cli或者npm i @vue/cli -g - 查看 vue/cli 版本:
vue --version - 创建项目架子:vue create project-name(项目名不能使用中文)
- 启动项目:yarn serve 或者 npm run serve(命令不固定,找package.json)
2.3 项目目录介绍
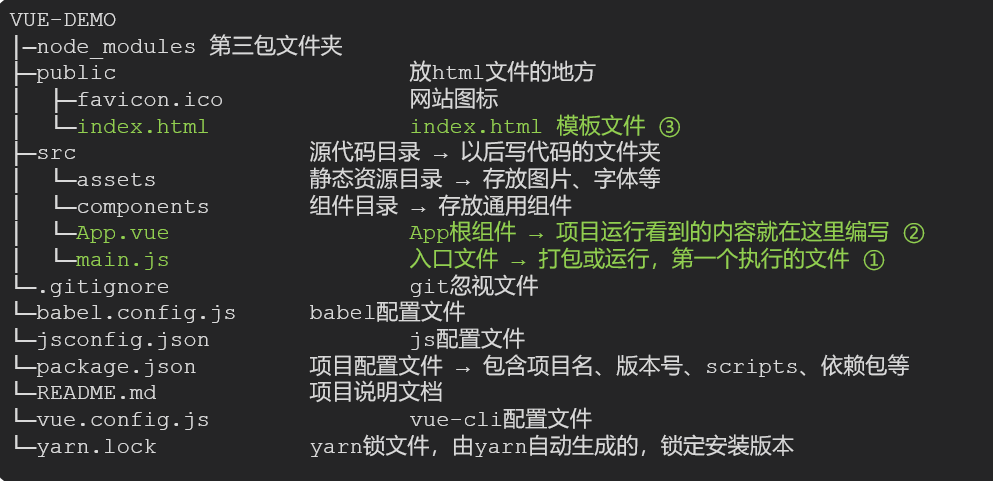
虽然脚手架中的文件有很多,目前咱们只需记住三个文件即可
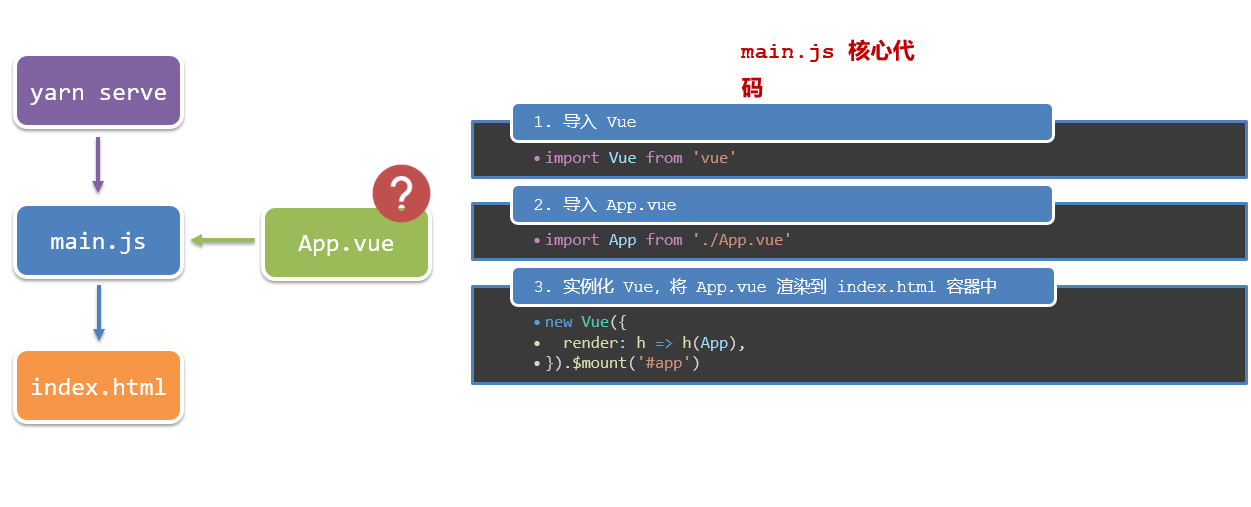
- main.js 入口文件
- App.vue App根组件
- index.html 模板文件
2.4 运行流程
3 组件化开发
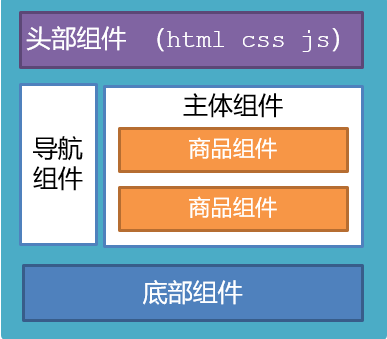
组件化:一个页面可以拆分成一个个组件,每个组件有着自己独立的结构、样式、行为。
好处:便于维护,利于复用 → 提升开发效率。
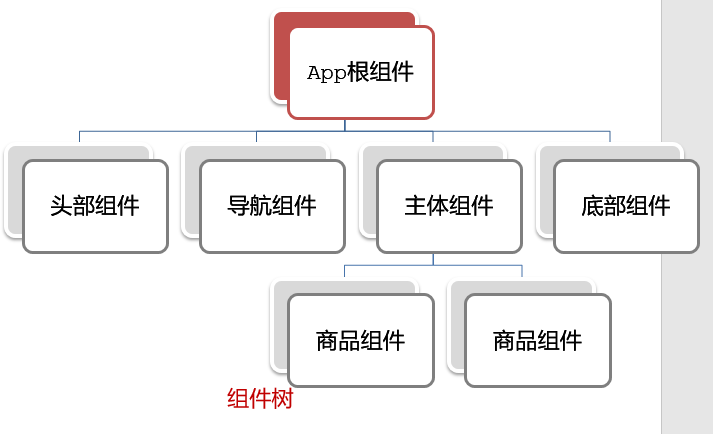
组件分类:普通组件、根组件。
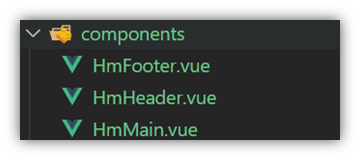
比如:下面这个页面,可以把所有的代码都写在一个页面中,但是这样显得代码比较混乱,难易维护。咱们可以按模块进行组件划分
3.1 根组件 App.vue
3.1.1 根组件介绍
整个应用最上层的组件,包裹所有普通小组件
3.1.2 组件是由三部分构成
- 语法高亮插件

三部分构成
- template:结构 (有且只能一个根元素)
- script: js逻辑
- style: 样式 (可支持less,需要装包)
让组件支持less
(1) style标签,lang=“less” 开启 less 功能
(2) 装包:
yarn add less less-loader -D或者npm i less less-loader -D
3.2 普通组件的注册使用-局部注册
只能在注册的组件内使用。
步骤:
- 创建.vue文件(三个组成部分)
- 在使用的组件内先导入再注册,最后使用
注意
组件名规范 —> 大驼峰命名法, 如 HmHeader
语法
使用方式:当成html标签使用即可 <组件名></组件名>
1 | |
3.3 普通组件的注册使用-全局注册
全局注册的组件,在项目的任何组件中都能使用
步骤
- 创建 .vue 组件(三个组成部分)
- main.js 中进行全局注册
注意
组件名规范 —> 大驼峰命名法, 如 HmHeader
语法
当成 HTML 标签直接使用
<组件名></组件名>
main.js 中书写 Vue.component('组件名', 组件对象)
例:
1 | |