Vue基础入门到实战2(指令补充+计算属性+侦听器)
1 指令修饰符
1.1 什么是指令修饰符?
所谓指令修饰符就是通过"."指明一些指令 后缀。不同的后缀封装了不同的处理操作 —> 简化代码
1.2 按键修饰符
- @keyup.enter —>当点击enter键的时候才触发
代码演示
1 | |
1.3 v-model 修饰符
- v-model.trim —>去除首位空格
- v-model.number —>转数字
1.4 事件修饰符
- @事件名.stop —> 阻止冒泡
- @事件名.prevent —>阻止默认行为
- @事件名.stop.prevent —>可以连用 即阻止事件冒泡也阻止默认行为
2 v-bind样式控制增强-操作class
为了方便开发者进行样式控制, Vue 扩展了 v-bind 的语法,可以针对 class 类名 和 style 行内样式 进行控制 。
2.1 语法
1 | |
2.2 对象语法
当class动态绑定的是 对象 时,键就是类名,值就是布尔值 ,如果值是 true,就有这个类,否则没有这个类。这个使用的时候,直接输入类名即可。
1 | |
适用场景:一个类名,来回切换
2.3 数组语法
当class动态绑定的是 数组 时 → 数组中所有的类,都会添加到盒子上,本质就是一个 class 列表。这个在使用时,里面的类名必须使用单引号包裹。
1 | |
使用场景:批量添加或删除类
2.4 代码练习
1 | |
3 京东秒杀-tab栏切换导航高亮
3.1 需求
当我们点击哪个tab页签时,哪个tab页签就高亮
3.2 准备代码
1 | |
3.3.思路
1.基于数据,动态渲染tab(v-for)
2.准备一个下标 记录高亮的是哪一个 tab
3.基于下标动态切换 class 的类名
4 v-bind对有样式控制的增强-操作style
4.1 语法
1 | |
4.2 代码练习
1 | |
4.3 进度条案例
1 | |
5 v-model在其他表单元素的使用
5.1 讲解内容
常见的表单元素都可以用 v-model 绑定关联 → 快速 获取 或 设置 表单元素的值
它会根据 控件类型 自动选取 正确的方法 来更新元素
1 | |
5.2 代码准备
1 | |
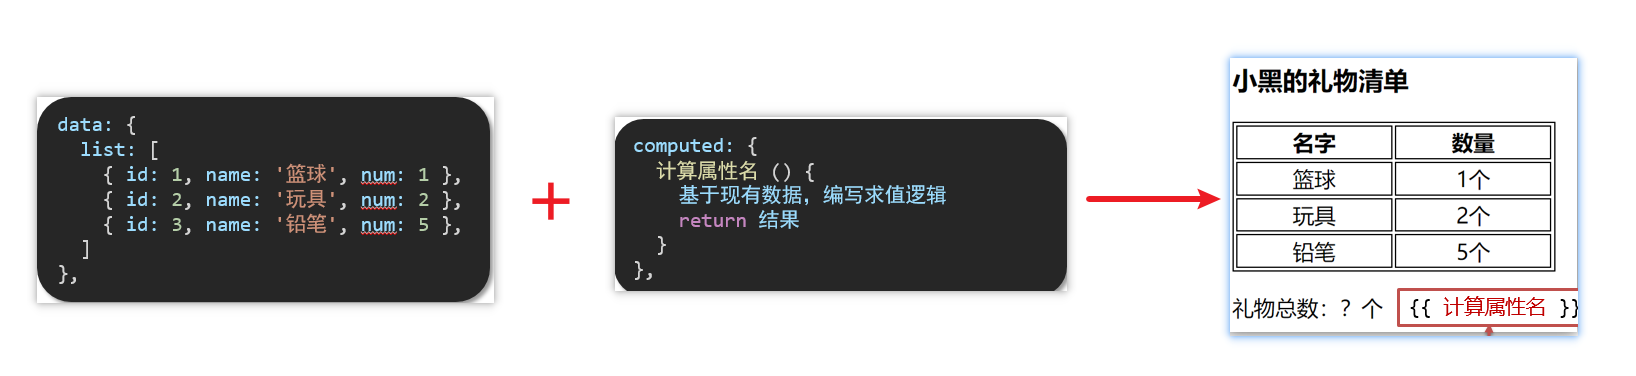
6 computed计算属性
6.1 概念
基于 现有的数据,计算出来的 新属性。 依赖 的数据变化,自动 重新计算。
6.2 语法
- 声明在 computed 配置项 中,一个计算属性对应一个函数
- 使用起来和普通属性一样使用
{{计算属性名}}
6.3 注意
- computed 配置项和 data 配置项是 同级 的
- computed 中的计算属性 虽然是函数的写法,但他 依然是个属性
- computed 中的计算属性 不能 和 data 中的属性 同名
- 使用 computed 中的计算属性和使用 data 中的属性是一样的用法
- computed 中计算属性内部的 this 依然 指向的是Vue实例
6.4 案例
比如我们可以使用计算属性实现下面这个业务场景。根据原有的礼物数量计算出总的礼物总数,礼物总数依赖于上面的礼物清单。
6.5 代码准备
1 | |
7 computed计算属性 VS methods方法
7.1 computed计算属性
作用:封装了一段对于 数据 的处理,求得一个 结果
语法:
- 写在 computed 配置项中
- 作为属性,直接使用
- js 中使用计算属性:
this.计算属性 - 模板中使用计算属性:
{{计算属性}}
- js 中使用计算属性:
7.2 methods计算属性
作用:给 Vue 实例提供一个 方法,调用以 处理业务逻辑。
语法:
- 写在 methods 配置项中
- 作为方法调用
- js 中调用:
this.方法名() - 模板中调用
{{方法名()}}或者@事件名=“方法名”
- js 中调用:
7.3 计算属性的优势
缓存特性(提升性能)
计算属性会对计算出来的结果缓存,再次使用直接读取缓存,
依赖项变化了,会自动重新计算 → 并再次缓存
methods 没有缓存特性
7.4 总结
1.computed 有缓存特性,methods 没有缓存
2.当一个结果依赖其他多个值时,推荐使用计算属性.
3.当处理业务逻辑时,推荐使用methods方法,比如事件的处理函数.
8 计算属性的完整写法
既然计算属性也是属性,能访问,应该也能修改了?
- 计算属性默认的简写,只能读取访问,不能 “修改”
- 如果要 “修改” → 需要写计算属性的完整写法
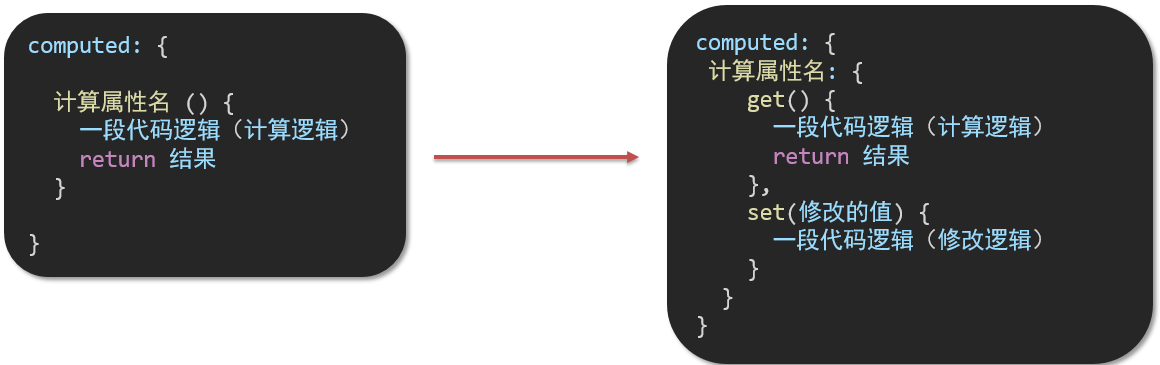
完整写法代码演示
1 | |
9 watch侦听器(监视器)
9.1 作用
监视数据变化,执行一些业务逻辑或异步操作
9.2 语法
watch 同样声明在跟 data 同级的配置项中
简单写法: 简单类型数据直接监视
完整写法:添加额外配置项
1
2
3
4
5
6
7
8
9
10
11
12
13
14
15
16data: {
words: '苹果',
obj: {
words: '苹果'
}
},
watch: {
// 该方法会在数据变化时,触发执行
数据属性名 (newValue, oldValue) {
一些业务逻辑 或 异步操作。
},
'对象.属性名' (newValue, oldValue) {
一些业务逻辑 或 异步操作。
}
}
9.3 翻译案例-代码实现
1 | |
9.4 完整写法
完整写法 —>添加额外的配置项
deep:true对复杂类型进行 深度监听immdiate:true初始化 立刻执行一次
1 | |
10 综合案例
购物车案例
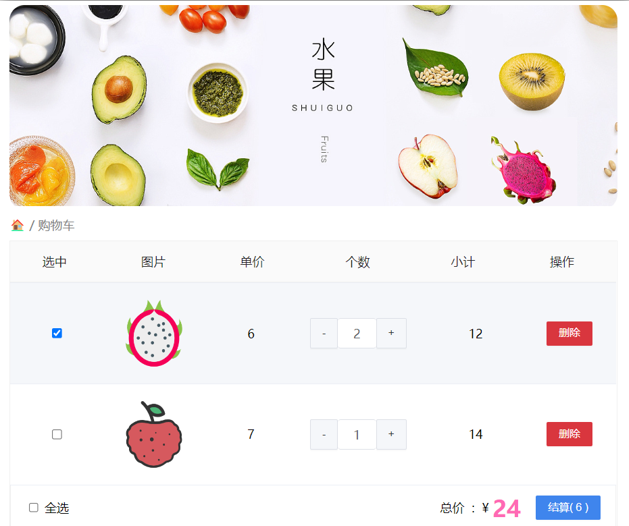
需求说明:
- 渲染功能
- 删除功能
- 修改个数
- 全选反选
- 统计 选中的 总价 和 总数量
- 持久化到本地
实现思路:
基本渲染: v-for 遍历、
:class动态绑定样式删除功能 : v-on 绑定事件,获取当前行的 id
修改个数 : v-on绑定事件,获取当前行的 id,进行筛选出对应的项然后增加或减少
全选反选
- 必须所有的小选框都选中,全选按钮才选中 → every
- 如果全选按钮选中,则所有小选框都选中
- 如果全选取消,则所有小选框都取消选中
- 声明计算属性,判断数组中的每一个 checked 属性的值,看是否需要全部选
统计 选中的 总价 和 总数量 :通过计算属性来计算 选中的 总价和总数量
持久化到本地: 在数据变化时都要更新下本地存储 watch
代码展示
1 | |